I finally got round to uploading my instructions on how to replace the self-signed SSL/TLS certificate on Trend Micro Smart Protection Servers (SPS) and now they go and create a menu option to make it easy for everyone to do!
Well to be fair the number of requests I got asking me to upload my instructions, having mentioned at some point in the past I would do so, is probably indicative of the general desire of SPS users.
In this post I’ll briefly cover the new SPS certificate import option which is available in version 3.1 and above of the SPS appliance.
First make sure your SPS appliances are up to date – example instructions can be found in my previous article – Upgrade Trend Micro Smart Protection Server
Once you have completed any necessary upgrades it’s time to logon to the web console and browse to the ‘Administration’ menu and then the ‘Certificate’ option.

I have obfuscated the SPS appliance fully qualified name but as you can see the certificate is issued by ‘Trend Micro’ with a 10 year life. Self-signed certificates really bug me especially when running in an enterprise with an internal certificate authority (CA).
Time to replace this certificate…
Certificate Requirements
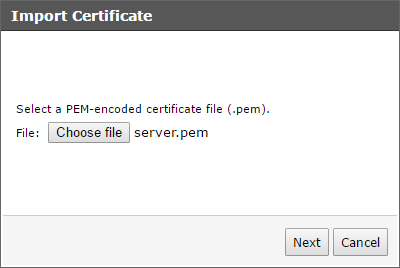
The web console interface doesn’t really give you much information to go on, it merely requests you provide a new certificate in .PEM format.
Now there are many ways to configure and create your certificates and I’m not saying the examples below must be adhered to – they are purely to give you a starting point if you are unsure.
Let’s create a config file with some basic information. The only sections you need to modify are the [alt_names] and the [req_distinguised_name], populate these values with ones appropriate to your environment. You can add more subject alternate names if you desire. Save the file with a sensible name, I tend to use the .cfg file extension to help me remember it’s the config file.
[ CA_default ]
 default_md = sha256

[ req ]
 default_bits = 2048
 default_keyfile = rui.key
 distinguished_name = req_distinguished_name
 encrypt_key = no
 prompt = no
 string_mask = nombstr
 req_extensions = v3_req

[ v3_req ]
 basicConstraints = CA:FALSE
 keyUsage = digitalSignature, keyEncipherment, dataEncipherment
 extendedKeyUsage = serverAuth
 subjectAltName = @alt_names

[alt_names]
 DNS.1 = BSA-TSPS01
 DNS.2 = BSA-TSPS01.bytesizedalex.com

[ req_distinguished_name ]
 countryName = GB
 stateOrProvinceName = London
 localityName = London
 0.organizationName = ByteSizedAlex
 organizationalUnitName = IT Services
 commonName = BSA-TSPS01.bytesizedalex.com
 emailAddress = [email protected]
Now that we have a configuration file we also need to create a private key. I’ll just use OpenSSL to generate one. This can easily be accomplished for a one line command –
C:\OpenSSL\bin>openssl.exe genrsa 2048 > myPrivateKey.key
 Generating RSA private key, 2048 bit long modulus
 ........................................................................+++
 .........+++
 e is 65537 (0x10001)

C:\OpenSSL\bin>
OK now we have a configuration file and a private key, the next step is to create a certificate signing request (CSR). Again I will use OpenSSL to do this –
C:\OpenSSL\bin>openssl.exe req -out "C:\Temp\certRequest.csr" -key "C:\Temp\myPrivateKey.key" -new -config "C:\Temp\myCo
 nfig.cfg"
OK now we have our CSR it can be submitted to a CA for processing and on completion a certificate will be made available.
The final step is to create our PEM file which is basically just a concatenation of the private key, public key and any CA certificates in the chain of trust. Create a text file and dump that information into it and set the file extension to be .pem. If you have subordinate certificate authorities you need to include all of them up to the root.
-----BEGIN RSA PRIVATE KEY-----
 THE PRIVATE KEY DATA HERE
 -----END RSA PRIVATE KEY-----
 -----BEGIN CERTIFICATE-----
 THE PUBLIC KEY (CERTIFICATE) DATA HERE
 -----END CERTIFICATE-----
 -----BEGIN CERTIFICATE-----
 SUBORDINATE CERTIFICATE AUTHORITY DATA
 -----END CERTIFICATE-----
 -----BEGIN CERTIFICATE-----
 ROOT CERTIFICATE AUTHORITY DATA
 -----END CERTIFICATE-----
For example (a lot of the data has been removed to shrink this down a bit) –
-----BEGIN RSA PRIVATE KEY-----
 MIIEpAIBAAKCAQEAzYh5R4juUSyPIj2ZLpVoeHNJkzNh8r8fGNpK8IjlmSbPxmp5
 maik/ovLubxznvS3CaVEA1Z3e7bRbbtFf8e2axZR8IWT5Pldrwdmxg==
 -----END RSA PRIVATE KEY-----
 -----BEGIN CERTIFICATE-----
 MIIHtzCCBp+gAwIBAgIKETbcMgACAABgoTANBgkqhkiG9w0BAQsFADCBhjESMBAG
 ZRzejWd77PO8hNoNUc4fblDgLea6+hAUaCtePJnAMl84BL5V8jaWovZ9ipnW6wTz
 As4O0NGH2n13gH8=
 -----END CERTIFICATE-----
 -----BEGIN CERTIFICATE-----
 MIIGgDCCBWigAwIBAgIKGYUZbwAAAAAAVjANBgkqhkiG9w0BAQUFADCBhDESMBAG
 hCdEG5aMskb9hElMEqPc1QIRFmqziIhZdS04TKejWSDYXEwNsMw2T4kTfhw3j6j1
 ulzdJubMmUYi0zI+FPMLel0PK9XsAmI7l6HFrtsyJjeRoJ4g
 -----END CERTIFICATE-----
 -----BEGIN CERTIFICATE-----
 MIIFgjCCBGqgAwIBAgIQR09dEXp9C4dBu4qCaqfUyDANBgkqhkiG9w0BAQUFADCB
 MvQfRljbve7NEHAIbx93gKk0Urd0A5YYngsSwO1DqvzoH+79MwN+sU/3ciIzvxhC
 p8Tlq3SYVvgV7RDmktAU97FeaBgrOQ==
 -----END CERTIFICATE-----
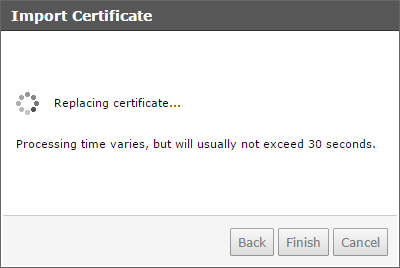
Once you have the PEM file you can select it for import and confirm the details.

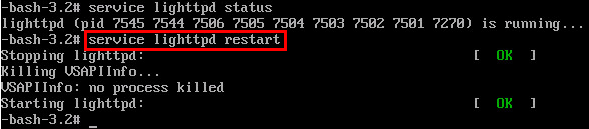
One thing I noticed on my appliances is that they did not automatically restart the lighttpd service to implement the new certificate so I had to do this manually via the virtual machine console.
It’s nice to see Trend Micro adding this sort of functionality to their systems – I guess my old technique is obsolete now but for those running older SPS versions it still may be valuable.